Fashion Photography

Hey

Here are some tips that can help you capture that perfect shot!

Fashion photography should convey an essence of authority, so your direction of the model(s) needs to be confident and self-assured.Prepare the location, props and clothes ahead of time and for a truly effective shoot be sure to communicate your agenda, objective and posing directions coherently and calmly.

Fashion photography is all about clothes and beauty, so pull all the elements of the scene and the model together to reflect this. For example if the shoot focuses on the clothes– use make-up and hair styling to compliment the garment – and vice versa.

Posing can be a tricky point to master but browse through the latest men’s and women’s magazines to target a few inspired suggestions as well as getting a grip on what is currently fashionable. Using ‘broken down’ poses or poses that require angular body shapes can add interest and edginess to the piece – as well as help to elongate body length.

A studio is an ideal place to perform a fashion shoot because photographers can easily control lighting and stabilize conditions. If you are shooting in a studio environment remember to meter all areas of the scene to avoid unwanted shadows and the use of a separate light meter rather than the one in your camera, will offer a more accurate reading.

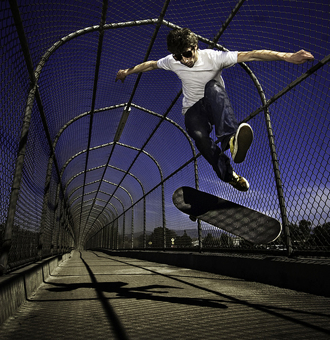
Location, location, location! Getting the right location is important if you want to convey a narrative within your shot. For example if the clothing and beauty styling are edgy, hard or provocative you may want to consider an urban setting , alternatively for spring/summer and natural fashions find a rural environment like; a field, meadow, beach, woodland or river bank.

Influence the image by moving around the scene and exploring which angles work best to full expose the garment. This could mean climbing a ladder, crouching low, working a slanted angle or moving closer to the subject. Think about what the message is here and create a composition to reinforce it.

-Miss Em

  • Digg
  • Del.icio.us
  • StumbleUpon
  • Reddit
  • RSS

Photo of the Day!

Photo of the Day


-Miss Em :)

  • Digg
  • Del.icio.us
  • StumbleUpon
  • Reddit
  • RSS

Photo of the Day!

Hey,

Here the photo of the day enjoy!


-Miss Em

  • Digg
  • Del.icio.us
  • StumbleUpon
  • Reddit
  • RSS

Fisheye Photography


Perceptual Distortion
A fisheye lens creates images with extreme barrel distortion, meaning subjects in the center look somewhat magnified, while the edges of the image quickly taper off and feature curved lines that do not reflect reality. The overall effect is a purposely warped view that provides plenty of opportunity for creative pictures.
The subject you focus on will be sharp and clear but peripheral elements away from the center of the picture will quickly begin to look distorted. In other words, background elements are generally secondary when using this lens, so your foreground subjects must be able to carry the composition and provide power to the image.

Specific Uses

  • You can create striking portraits with a fisheye lens.

  • Tends to guide a viewer's eyes towards the middle of the frame and draws attention to the person you're shooting.

  • Capturing Animals. Most animals move towards lenes.

  • The super wide angle of a fish eye lens lets you shoot very close to your furry friends, and the silly distortion helps accentuate their fun personalities.

  • In tight quarters, such as a small room, this large field of view is helpful in capturing groups of people or action shots where fast-moving subjects are hard to capture with a regular lens.

But the one thing you must remember is not to overuse the fishlense, because it could get tiresome.

-Miss Em

  • Digg
  • Del.icio.us
  • StumbleUpon
  • Reddit
  • RSS

Photoshop Tutorial

Hey,

Here is a tutorial on changing eye color. Enjoy


Here is a tutorial on how to remove color. Enjoy!


Here is a tutorial on how to creat silhouettes. Enjoy!


-Miss Em :)

  • Digg
  • Del.icio.us
  • StumbleUpon
  • Reddit
  • RSS

Photo of The Day!

Hey,

Heres the photo of the day; Enjoy!


-Miss Em :)
P.S. Try to recreate this photo, and see what you get!

  • Digg
  • Del.icio.us
  • StumbleUpon
  • Reddit
  • RSS

High Speed Photography

Hey,

High speed photography is one of my favorites to capture! It's so exciting to capture and see what comes from it. Here are a few tips on high speed photography.


What you need:


  • External Flash

  • Flash Trigger

Most people believe that speed photography is done through very fast shutter speeds, like 1/1000 or faster. However, this is not true. Flash duration is the primary component for capturing motion. The duration of flash units range from 1/1000 of a second to almost 1/30,000 of a second. So as long as your subject is very dark, the only light your camera sensor will see is the light coming from the flash for that very short duration.

Flash Triggering
So now that you know that flash duration is more important than shutter speed, you need to have a way to fire the flash when the action happens. This is done by using a flash trigger. There are three main types: sound, light, and mechanical. Sound triggers will fire the flash when a loud sound is heard, and mechanical triggers fire when something comes in contract with the trigger. Light triggers create a beam of invisible light between two points, and fire the flash when the beam is broken (commonly used for water drop photos). The sound trigger I use was a home-built job with parts from Hiviz. They kits are cheap ($7), but require a little electrical expertise. If you have an electronics background, they are super-easy to build. If you would like a fancy pre-built model, you can get one for about $170 here.


The Photo shoot

  • Turn off or dim the lights

  • Open the shutter

  • Perform Action
Examples


Hope you enjoy, and learned something!


-Miss Em

  • Digg
  • Del.icio.us
  • StumbleUpon
  • Reddit
  • RSS

Photo of the Day!

Enjoy this photo! It speaks to me :)


-Miss Em

  • Digg
  • Del.icio.us
  • StumbleUpon
  • Reddit
  • RSS

Photo of the Day

Hey

Heres the photo of the day!


-Miss Em

  • Digg
  • Del.icio.us
  • StumbleUpon
  • Reddit
  • RSS

Wedding Photography Tips

Hey,

Weddings are memorable occasions that everyone wants to remember, but that day could be ruined if the right moments are not captured. Here is a short video from 5min.com, with some tips that can help you make someones day special and always memorable.


-Miss Em :)

  • Digg
  • Del.icio.us
  • StumbleUpon
  • Reddit
  • RSS

Photo Of the Day!


This Picture Captures My Soul!


-Miss Em

  • Digg
  • Del.icio.us
  • StumbleUpon
  • Reddit
  • RSS

Action Photography


Carry the right equipment: If you can, carry a wide range zoom lens which will help you in framing your subject.


Use the correct Settings: Set the camera to programmed mode or shutter priority mode. In order to freeze action you will want to be able to choose the shutter speed. 1/250 sec is a good estimate to start with.


Use the right Techniques: There’s more than just freezing the subject. Planning is a wonderful technique which exhibits your expertise as a professional photographer.
Anticipate: Be prepared and anticipate the moment. The more you shoot, the better you’ll get at it. Some of the most spectacular moments are captured only because the photographer used the shutter at the right moment.


Shooting mode: The camera by default shoots one frame every press of the shutter. You may want to set it to shoot in the continuous mode so that it keeps clicking while you keep the shutter release pressed. This way you’ll be able to take more the one shot for the action you want to capture. In the end you’ll always be able to pick the better of those.


Image Format: Shoot in fine JPEG. RAW format creates huge files. This means your card will fill sooner than you expect in the continuous mode. Secondly it also tends to slow down the frame rate because he camera buffer is still occupied before the camera can take the next shot.


Focus Mode: Set the camera to use continuous focus. You may have to dig into the menus to get to this setting. Normally the camera focuses only once when you press the shutter release button halfway. When you use continuous focus and hold down the shutter release button halfway and follow that running guy, the camera will continuously keep the moving subject in focus. Comes in very handy if the subject is changing the distance from the camera (like running towards or away from you).


Action in the Night: Lighting conditions are challenging in the night. Use the high ISO setting. Firing the flash will make sure that the subject is lit only for a fraction of a second even though the shutter speed may be low. This will eventually freeze the subject to a considerable extent since the subject was lit only for a brief moment.


-Find a suitable place to shoot action. If you can, you’ll get some good action happening on a busy read.
-Set the shutter speed to 1/60, 1/125, 1/250 and 1/500 for various shots.

Hope you enjoyed :)

-Miss Em

  • Digg
  • Del.icio.us
  • StumbleUpon
  • Reddit
  • RSS

Flower Photography

Many think it may be easy to snap shots of flowers. I have to admit it is as with any other image for that matter, that is why they are called snap shots but in order to capture a great shot it is not, there are many factors to be considered including preparation.

Positioning
First things to consider is if taking photos outside you must make sure you don’t do it on a windy day if at all possible. It is too difficult to capture still life it when it it moving about, the end result will be a blurry photo, especially if using macro. If necessary hold the bottom of the flower still with your hand trying to exclude your hand from the photo.

You should be level or just a fraction above level with the plants when capturing an image. If you have a tripod set it up level or just above level with the plants, if not kneel or squat down but find a position where you can have a steady hand. If going for an individual plant you can use macro, however; sometimes if too close, macro will only capture a section of the plant, blurring the rest. If you want the whole plant you will have to use manual or automatic but make sure your well enough away from the plant to capture a clear image but not so far that it is blurred.

Lighting And Exposure
Always have the light behind you. I find the best time of day to capture a better floral image is in the late afternoon or early evening. Too much light will overexpose the image. Never stand over the flower and snap directly down on the flower except if your taking a macro/close up shot of the stamen, sepals or petals. If using a flash this can overexpose the plant and in this position it will look too much like a plain snapshot. Never use a flash on individual plants although unless it is a very dark day I would not recommend a flash for any floral or garden scene, it will often overexpose the plants and tends to distort the intensity of the rich colors.

These tips should help in you capturing the pefect floral image :)

-Miss Em

  • Digg
  • Del.icio.us
  • StumbleUpon
  • Reddit
  • RSS

Digital or Film?

Hey photography world,

So every photographer out there is faced with the same dilemma; should I get a digital or film camera?

Pros of a digital camera

  • Instant feedback-No more worrying about if the picture came out ok, or wondering if you captured your vision
  • No Film-You don’t have to hassle with film, and you will be saving a lot of money
  • No printing-Another aspect you do not have to waste your money on. You can store all of your pictures on your computer
  • Space-You do not have to worry about wasting your film. With a digital camera you have the freedom to take as many pictures as you want.

Cons of a digital camera

  • Complexity-Most people are not technology savvy and will have problems learning the new buttons and gadgets.
  • Storage-If you have a laptop and/or home computer with a lot of space for storing your pictures great, but if you do not then you might have a problem with were to keep your great photos.
  • Cost-Film cameras are cheaper, about $100 cheaper to be exact. The average price for a digital camera, is $325
  • Battery life-Most digital cameras deal with batteries or they must be charged. They can die pretty fast

Pros of a film camera

  • Cost-They are cheaper then digital cameras

Cons of a film camera

  • You have to keep buying film.
  • The film must be developed
  • You can not make mistakes
  • You can not review your photos

-As you can see film cameras do not have as many pros as the digital camera. But hey its all in the eyes of the creator.

But in my opinion, digital cameras are better :)

  • Digg
  • Del.icio.us
  • StumbleUpon
  • Reddit
  • RSS

Pages

Powered by Blogger.